Procedural Color - HSB vs. RYB
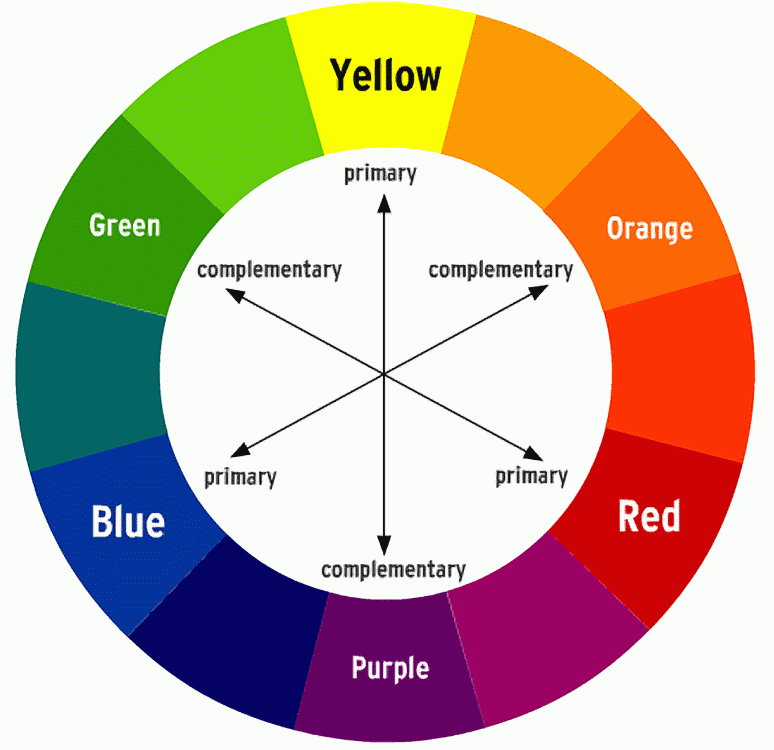
Eventually we want to be able to start incorporating color techniques from traditional art, such as color harmonies, into our generative artwork. In order to do that, however, we have a slight issue: the color wheel that is typically assumed for color harmonies is not exactly the same as the HSB color wheel.
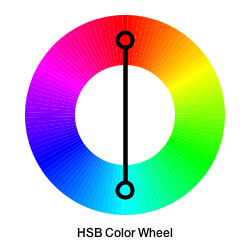
Here is a comparison of the HSB color wheel at full saturation and brightness compared with the traditional RYB color wheel used by artists:
 |
 |
The two images are rotated differently but note how the complementary color of red in the HSB color wheel is a light blue instead of green as it is in the traditional color wheel. The basic transformation being done is that green from the RGB color wheel is replaced with yellow and the other colors squashed accordingly.
This is a problem for us because we want to be able to apply ideas from traditional color theory to generative art. Luckily, there are two simple ways to correct this disparity: one using easing functions and another using table-based approximation.!
HSB Correction via Easing Functions
Easing functions are a simple way to remap a range of values in a controlled way, allowing us to compress and expand regions of interest. I have an entire post on easing functions so I won’t go into more details here.
My approach to deriving the traditional color wheel from the HSB one was to simply
bruteforce values for the exponent to the map3() function in my earlier post,
till it matched what I wanted.
Here’s the simple function I ended up with to correct HSB hues:
float hsbCorrection(float hue) {
  return map3(hue % 360, 0, 360, 0, 360, 1.6, EASE_IN);
}
Here is the result of this simple transformation:
|
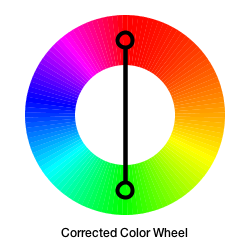 |
It’s nowhere close to perfect but it’s good enough that we’re not completely off base when picking colors based on traditional color theory. For example, the complementary of red is now correctly identified as green.
HSB Correction via Table-Based Approximation
The second approach to going from an HSB hue wheel to an RYB one is to simply sample periodic points points on the HSB wheel and map it to an equivalent value on the RYB wheel. This way, we can build up a table of mappings for periodic angles on the two wheels, and use linear interpolation for colors falling in-between them. This is an idea I’ve seen used in Nodebox. Here is my version of this in Processing:
float hsbCorrection(float hue) {
  float ryb_hue = 0;
  float[][] ryb_wheel = {
    {  0,   0}, { 15,   8}, { 30,  17}, { 45,  26},
    { 60,  34}, { 75,  41}, { 90,  48}, {105,  54},
    {120,  60}, {135,  81}, {150, 103}, {165, 123},
    {180, 138}, {195, 155}, {210, 171}, {225, 187},
    {240, 204}, {255, 219}, {270, 234}, {285, 251},
    {300, 267}, {315, 282}, {330, 298}, {345, 329},
    {360, 0  }
  };

  hue = hue % 360;

  for (int i = 0; i < ryb_wheel.length - 1; i++) {
    float x0 = ryb_wheel[i][0];
    float y0 = ryb_wheel[i][1];
    float x1 = ryb_wheel[i + 1][0];
    float y1 = ryb_wheel[i + 1][1];

    /* Ensure that y1 > y0 */
    if (y1 < y0)
      y1 += 360;

    /* If hue lies between y0 and y1, do linear mapping */
    if (hue >= x0 && hue < x1) {
      ryb_hue = map(hue, x0, x1, y0, y1) % 360;
      break;
    }
  }

  return ryb_hue;
}
The code above is fairly simple. I first initialize a 2D array with two columns and a bunch of rows. Each row consists of a pair of numbers: the first specifies the color on the HSB color wheel, and the second specifies the equivalent angle on the RYB color wheel. So for example, the HSB hue 240 maps to the RYB hue 204. This is basically just a manually-created lookup table!
Based on this, we write a bit of code to figure out which interval a user-specified hue lies in, and use the map function to interpolate between the two equivalent RYB hues. Here is the result of this simple table-based approach:
|
 |
Personally, I prefer the latter approach, and it is what I’ll use in upcoming posts. Feel free to tweak things around to suit your tastes! Remember, there are no hard rules when it comes to art.